Using
SWAP to Locate a Teleseismic Earthquake
When an earthquake is detected at your station you may be able to determine information such as distance and magnitude from your record, but not be able to determine the location of the epicenter. In order to do that you must have data from three stations, not too close together, and use a process called triangulation. The purpose of this exercise is to show you how you can use SWAP to analyze a data set and determine an earthquake’s location.
- If the earthquake set is on a disk, insert the disk into the computer.
- Open
SWAP. When the screen appears click
 . A window will appear in which you
can select the location of the data set to be used: disk, hard drive, or
desktop. Select the appropriate location.
. A window will appear in which you
can select the location of the data set to be used: disk, hard drive, or
desktop. Select the appropriate location. - The
top seismogram will be highlighted. Click the
 icon. This will open another screen with the selected
seismogram across the main window. Depending on which version of swap you
are using, the window should look like this:
icon. This will open another screen with the selected
seismogram across the main window. Depending on which version of swap you
are using, the window should look like this:
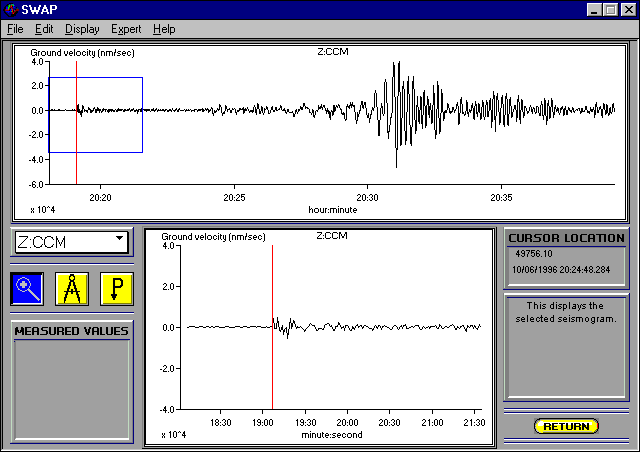
There are 3 icon buttons to the
left and below the top window. One is the letter P, another is a picture
of calipers, and the third is a picture of a magnifying glass.
The ![]() tool is used to pinpoint a pot on the
seismogram; this is used to mark where you think the P-wave arrival might
be. The caliper
tool is used to pinpoint a pot on the
seismogram; this is used to mark where you think the P-wave arrival might
be. The caliper ![]() tool
is used to measure the wave amplitude and period (duration/time) of selected
waves on the seismogram. The magnifying
glass
tool
is used to measure the wave amplitude and period (duration/time) of selected
waves on the seismogram. The magnifying
glass ![]() tool
is used to "blow up" a portion of the seismogram by clicking
and dragging the cursor across a selected area of the seismogram. Directly
above the 3 icons is a scroll menu; by pointing and clicking on the up or
down arrow, you can choose which previously-loaded seismogram you want to
analyze. The smaller window below the main window will display the area you
have chosen with the magnifying glass tool.
tool
is used to "blow up" a portion of the seismogram by clicking
and dragging the cursor across a selected area of the seismogram. Directly
above the 3 icons is a scroll menu; by pointing and clicking on the up or
down arrow, you can choose which previously-loaded seismogram you want to
analyze. The smaller window below the main window will display the area you
have chosen with the magnifying glass tool.
4.
Click on the magnifying glass ![]() icon. Move the
cursor to an area above and to the left of where you suspect the P-wave arrival
to be. Click and drag downward and to the right; a dotted-line box will show
the area you have chosen. Release the mouse button; the area chosen will appear
in the smaller box toward the bottom of the screen, magnified. This is your
selected area. You may repeat the use of the magnifying glass symbol to further
enlarge a portion of this selected area.
icon. Move the
cursor to an area above and to the left of where you suspect the P-wave arrival
to be. Click and drag downward and to the right; a dotted-line box will show
the area you have chosen. Release the mouse button; the area chosen will appear
in the smaller box toward the bottom of the screen, magnified. This is your
selected area. You may repeat the use of the magnifying glass symbol to further
enlarge a portion of this selected area.
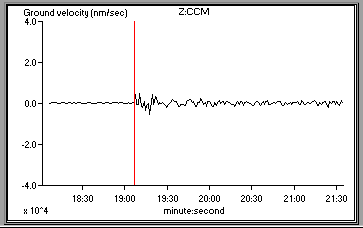
5.
After you have magnified the area enough to select a P-wave arrival,
click onto the P ![]() icon. This will generate a cursor of a
P with an arrow below it. Move this cursor to the point of suspected P-wave
arrival; as you move this cursor, note that the time (to a thousandth of a
second) is readable in the box to the right of the selected area. Click on
the selected point; a vertical line will appear on both the lower and upper
seismograms. If not satisfied with this point, you may re-select and click
on any other point.
icon. This will generate a cursor of a
P with an arrow below it. Move this cursor to the point of suspected P-wave
arrival; as you move this cursor, note that the time (to a thousandth of a
second) is readable in the box to the right of the selected area. Click on
the selected point; a vertical line will appear on both the lower and upper
seismograms. If not satisfied with this point, you may re-select and click
on any other point.
6. Go to the small scroll menu below the top seismogram (or return to the main window). Scroll to the next station's seismogram, release the mouse button, and that seismogram will appear in the upper box. Repeat the P-wave selection procedure described above for this seismogram.
7. Continue this procedure until you have chosen P-wave arrivals for each seismogram in the set.
8.
Click on the Return bar at the bottom of the page. You will
go back to your original screen; you should notice that vertical lines are
now at the selected P-wave arrivals for the seismograms. If one or more arrivals
are missing, highlight that seismogram, and press ![]() to
go back to pick that arrival.
to
go back to pick that arrival.
9.
If all P arrivals are chosen, click the ![]() button;
you will get a new screen with a globe and your selected seismograms in a
table below it, like this:
button;
you will get a new screen with a globe and your selected seismograms in a
table below it, like this:
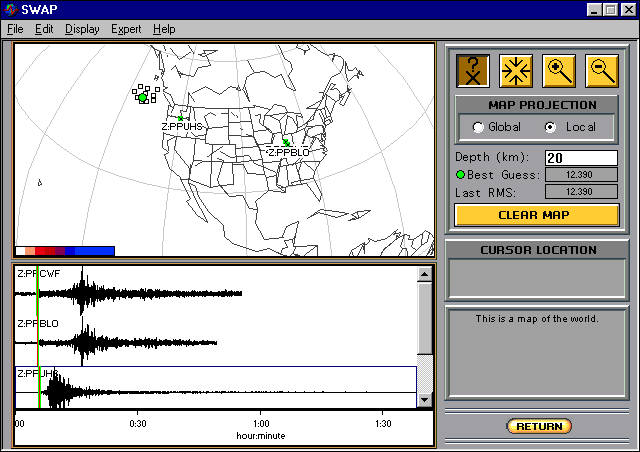
In the Upper right are 4 buttons
with icons; the 4 inward-pointing arrows ![]() are for centering
your view of a location, the X with a ?
are for centering
your view of a location, the X with a ?
![]() is
for selecting a potential epicenter, the magnifying glass with a "-"
is for zooming out, and the magnifying glass with a "+" is
for zooming in.
is
for selecting a potential epicenter, the magnifying glass with a "-"
is for zooming out, and the magnifying glass with a "+" is
for zooming in. ![]()
10.
Under "map projection", click on
local. Click the inward-arrow icon ![]() . Move the cursor to the globe and click onto the edge
of the globe. It will rotate the globe. Do this until
you can see your suspected location. Click on that location, which will center
it into view.
. Move the cursor to the globe and click onto the edge
of the globe. It will rotate the globe. Do this until
you can see your suspected location. Click on that location, which will center
it into view.
11.
Click the X? icon ![]() .
Move the cursor to a suspected epicenter and click on that location. A square
will appear; its color will tell you how close you are to the actual epicenter.
If it is white, you are close; the farther away you click, the color of the
square will change according to the scale at the lower left of the screen.
After each estimated location the program will display your best choice as
a green dot. When you have a green dot surrounded by white squares,
that is your best location, based on your P-wave selections.
.
Move the cursor to a suspected epicenter and click on that location. A square
will appear; its color will tell you how close you are to the actual epicenter.
If it is white, you are close; the farther away you click, the color of the
square will change according to the scale at the lower left of the screen.
After each estimated location the program will display your best choice as
a green dot. When you have a green dot surrounded by white squares,
that is your best location, based on your P-wave selections.
At this point, you may want to
expand your view of the location by clicking on the Magnifying glass icon
![]() , then clicking on top of your green dot.
It is also fun to use this feature to show the location of the chosen PEPP
stations, by clicking on the US area. I have found that if you expand you
view first and then try to locate the epicenter,
there is more error in the location for some reason.
, then clicking on top of your green dot.
It is also fun to use this feature to show the location of the chosen PEPP
stations, by clicking on the US area. I have found that if you expand you
view first and then try to locate the epicenter,
there is more error in the location for some reason.
Don't expect your chosen location to be absolutely exact, especially if you didn't double-check your P-wave arrival times on the PEPP website first.
12. Check location with seismicity map
13. Check location with PDE.