Using Guralp's GCFInfo
The tool that makes SCREAM most useful as a replacement for the DOS-based QUAKES
program is Guralp's GCFInfo. With GCFInfo, it is possible to combine
files, cut files given specific time parameters, and convert gcf-format files
into PEPP and other formats.
Putting Files into GCFinfo
Open GCFinfo. The main window
will look like this (this picture is shown with an hour file already added):

Using Windows Explorer,
locate and open the SCREAM file sets. SCREAM saves a file for
every hour of the day. The file name denotes the time and date of the beginning
of the data file. For example, an hour file named 1990701_2300Z.GCF
is read: year (1999), month (07), day (01), time (2300), component (Z) and
format (GCF). The time is given in Universal (Greenwich Mean) time. So this
file is for 11:00 PM to Midnight (in England) on July 1, 1999. [Depending
on your time zone here in the US, you might have to subtract 5 (or more) hours
to convert to local time. Remember, though, that DRMs from Princeton and statements
from USGS, SAC, and other sources are also in Universal time.]
Click onto a file. It will become
highlighted. If your time of interest spans two or more hours, you will
need to select 2 or more files. To do this, hold down the Shift key
and use the up and down arrows to highlight additional files, or use the mouse
to select files. Click onto the highlighted area and drag the files to the
GCFinfo window. Release the mouse.
Combining Files
If you want to use the SCREAM
Replay Mode to examine these hour files as a set, highlight all the files, again
using the Shift key and arrows. Right-click the mouse and a pull-down
menu appears:
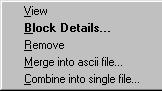
Select "Combine into single file". At this point, the combined
file can be dragged into the Replay Control window of SCREAM.
Viewing a Combined File in GCFinfo
The quickest way to look
at a combined file and/or cutting data is to Right-click onto the highlighted
files and select View. If you are not going to use Replay Mode
of SCREAM, you do not have to combine the files into a single file first.
GCFinfo will open a new window like this:
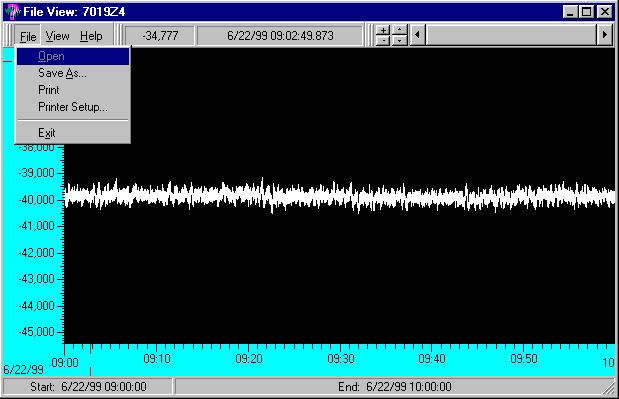
This window is shown with
the File pull-down menu already chosen. The + and buttons
are used to increase and decrease amplitude. The up and down bars simply move
the display up and down on the screen. To expand an area of the display, click
and drag across the section to be enlarged. To restore, just Right-click
on the background.
Cutting a File to Send to Princeton
After receiving a DRM from Princeton, select the hour files which
contain the times of the DRM quake (depending on the duration of the quake,
it may require two individual hour files, never more than three). Drag the files
into GCFInfo. Open the View pull-down menu.
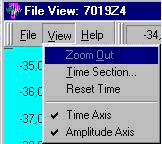
Select Time Section.
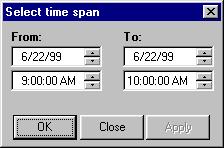
Another small window appears, showing the starting and ending times of the wave
view window. Enter the desired starting and ending times for the event to be
cut. Notice that the times in this window are in 12 hour (AM and PM), not 24
hour format.
The wave view window is adjusted,
showing what the file will look like when sent to PEPP. If it appears to be
OK, click onto the File selection and choose Save As.
Another window will appear.
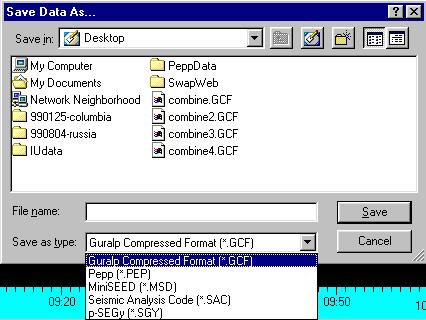
Give the file a name; type
it in the space. Save as type PEPP in the pull-down menu [If
you plan to reexamine the file with SCREAM or GCFInfo, you may save the file
in GCF format.]. Indicate where to save the to: desktop, hard drive,
floppy, etc. If you will send the data to Princeton and also want to be able
to access the file in SWAP, WINquakes, or MATseis, it may be helpful to save
to floppy. Insert a floppy into the computer and complete the save procedure.
Close out all the windows. To remove
the list of hour files from the main GCFinfo window, Right-click on the highlighted
files and select Remove.